Taking on the entire Sangre de Cristo Traverse is no small task. Shorter trips could help get one prepared for the entire line. Many of these suggestions use both the Range Traverse and High Route sections to create a shorter distance trip.
Just like the full routes, don’t just take into consideration mileage when planning how many days you’ll be out, as elevation gain and loss will most likely be much more than you’re used to. In the back of your mind, consider reasonable Plan B’s if you are planning to spend a night out on the ridge, but weather won’t allow.
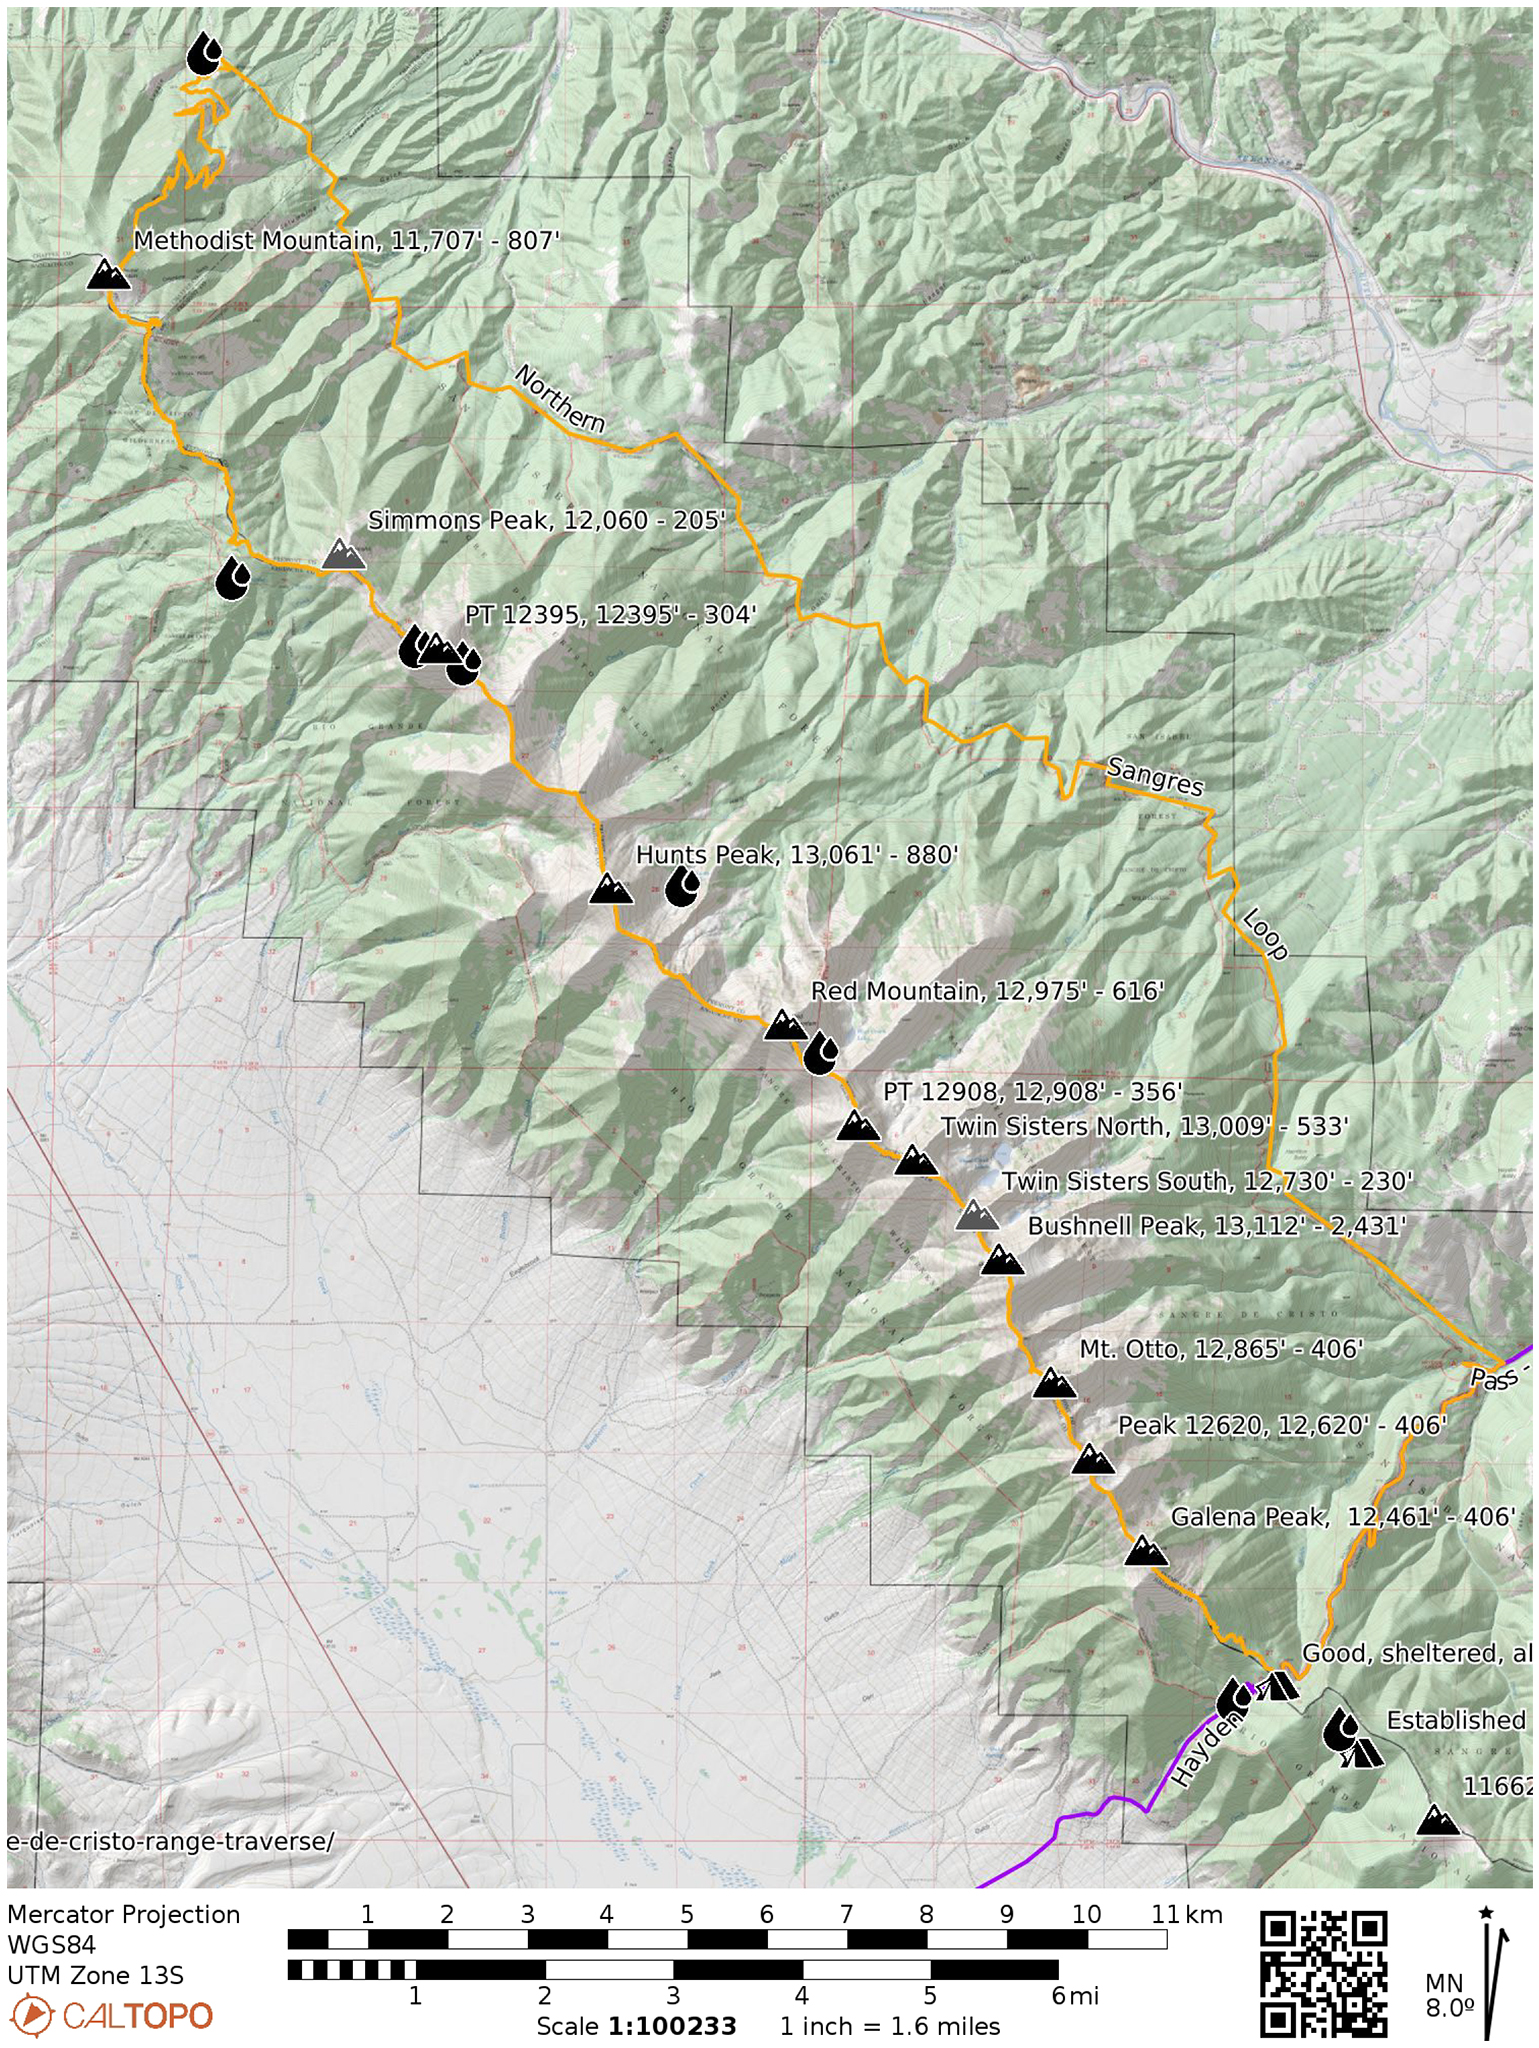
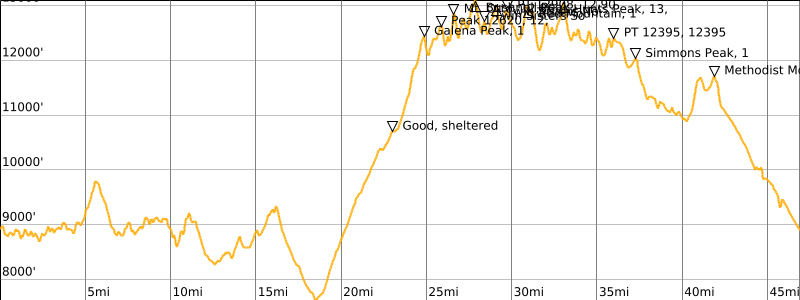
Northern Sangre de Cristo Range Traverse Loop
46.9 miles, 18,247′ gain/loss


The Northern Sangre de Cristo Loop Route makes a bold introduction to Sangres ridge traversin’.
From the Rainbow Trail Trailhead outside of Salida (free small parking lot available), take the Rainbow Trail southeast to Hayden Pass Road, then hike the road southwest to the top of Hayden Pass. The, hike up the steep, sun-exposed Hayden Pass road 5 miles to the summit of Hayden Pass. Many dispersed campsites are available on this road that you’ll have to share with 4WD enthusiasts. This is Segment 5 of the Sangre de Cristo High Route hiked in reverse of how the narrative is written.
Several creeks are crossed that should have flowing water, including a large creek (Hayden Creek) near Hayden Pass Road by the campsite. This campsite also has a well, but was not functioning at our last visit in June 2024, due to contamination.
There are also a few different trails off of the Rainbow Trail that reach high basins near the main ridgeline that you can use instead of the Hayden Pass Road to shorten the loop. You can also use these trails to bail off the ridgeline once you’re on it. We don’t suggest bailing down into any basin that does not have a trail to it, as subalpine travel in the Sangres can be quite a misadventure due to blowdown.

From there, follow Segment 5: Hayden Pass to Salida of the Sangre de Cristo Range Traverse Route back to your starting point at the Rainbow Trail trailhead.
You can slice and dice this trip in several ways, but here are two suggestions:
Clockwise
From town, it pays to look at the ridgeline and to pick out any obvious northern facing snowfields you may be able to see. These can make water sources for later.
Start out on the Rainbow Trail relatively early, and travel on the Rainbow Trail towards Hayden Pass. It’s 20 miles to the road and 5 more miles to the crest of the pass. This makes a stout first day, but the going is relatively easy on trail, as well as on the 4WD road. While along the road, again look at the main ridgeline for snow.
Camp on the pass at some good albeit dry spots. If you don’t have enough water, remember that there may be a flowing spring to the west side of the pass. If not, you’ll have to find the spring to the south of the pass, as documented in Segment 4 of this guide. Whatever you do, do not begin the ridge traverse section of this trip without adequate water.
Get up as early as possible to start your odyssey on the ridgeline towards Galena Peak. Your goal is to complete as much as possible of the ridgeline, get down below Simmons Peak and into the trees to camp in relatively safety. Even the fire-ravaged ridgeline after Simmons is a better option than camping on the ridgeline above treeline. At the very least, attempt to make it to PT 12401 and into its depressions. If it’s windy/stormy and you haven’t made it that far, camp below the main ridgeline to the east, using a subsidiary ridgeline to carefully get down or pick one of the basins that does have a trail from the Rainbow Trail up to it, and make a high camp.
Source and save some water for the next day.
The next day, complete the ridge to the Communications Tower/Methodist Mountain, then down to the Rainbow Trail Trailhead.
Counterclockwise
Alternatively, do the loop going the opposite direction, with the first day being relatively shorter and camping just below Simmons Peak. This will be a dry camp, so bring a good amount of water.
The next day, start your ridgeline odyssey as early as you can, timing it so that you get near the base of Hunts Peak at dawn. Hunts is very steep and somewhat high peak for this segment of the ridge, and you would benefit from seeing what you’re doing. Your goal is to make it to Hayden Pass before resting again — no easy feat!
Camp at Hayden Pass, or if you have it in you: descend as much as you like down Hayden Pass Road. Camping is available on the road itself. If water is required, know that the creek should be flowing at the base of the pass.
For your final day, hike the relatively benign Rainbow Trail to the Trailhead on Methodist Mountain Road. From Hayden Pass, it’s 25 miles back to the trailhead; from the Hayden Pass Road/Rainbow Trail trail junction, it’s 20 miles.
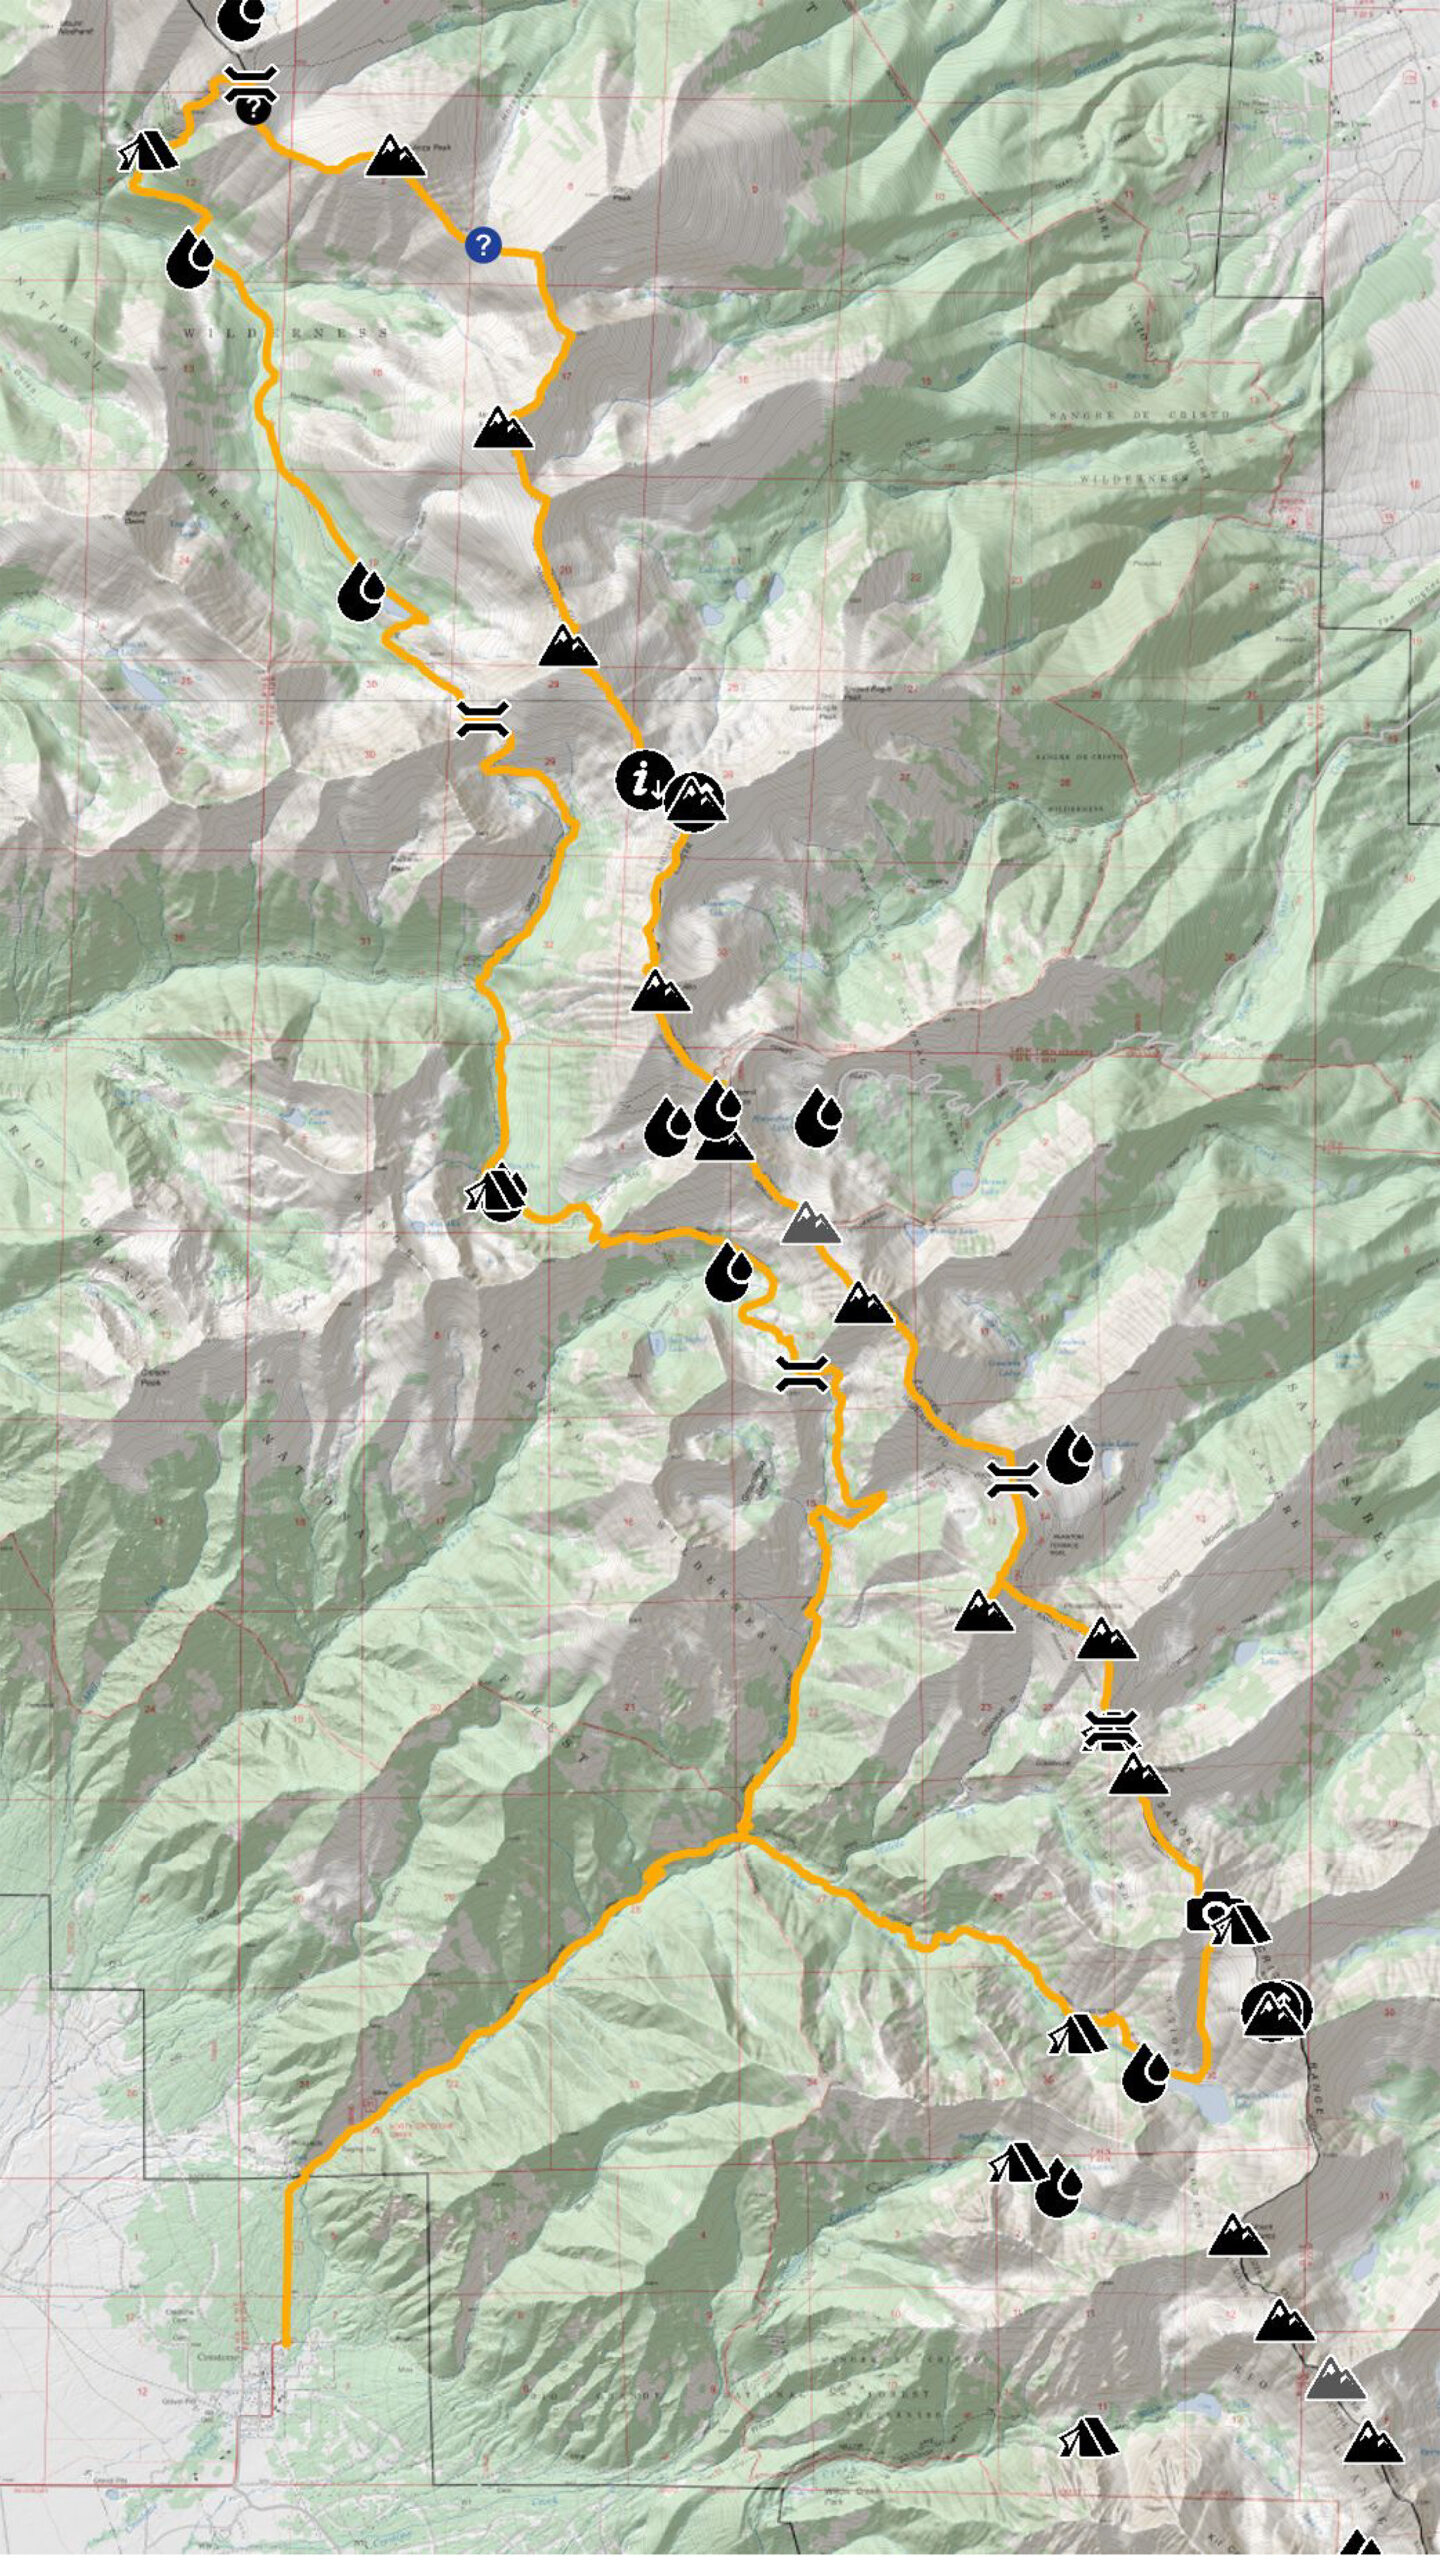
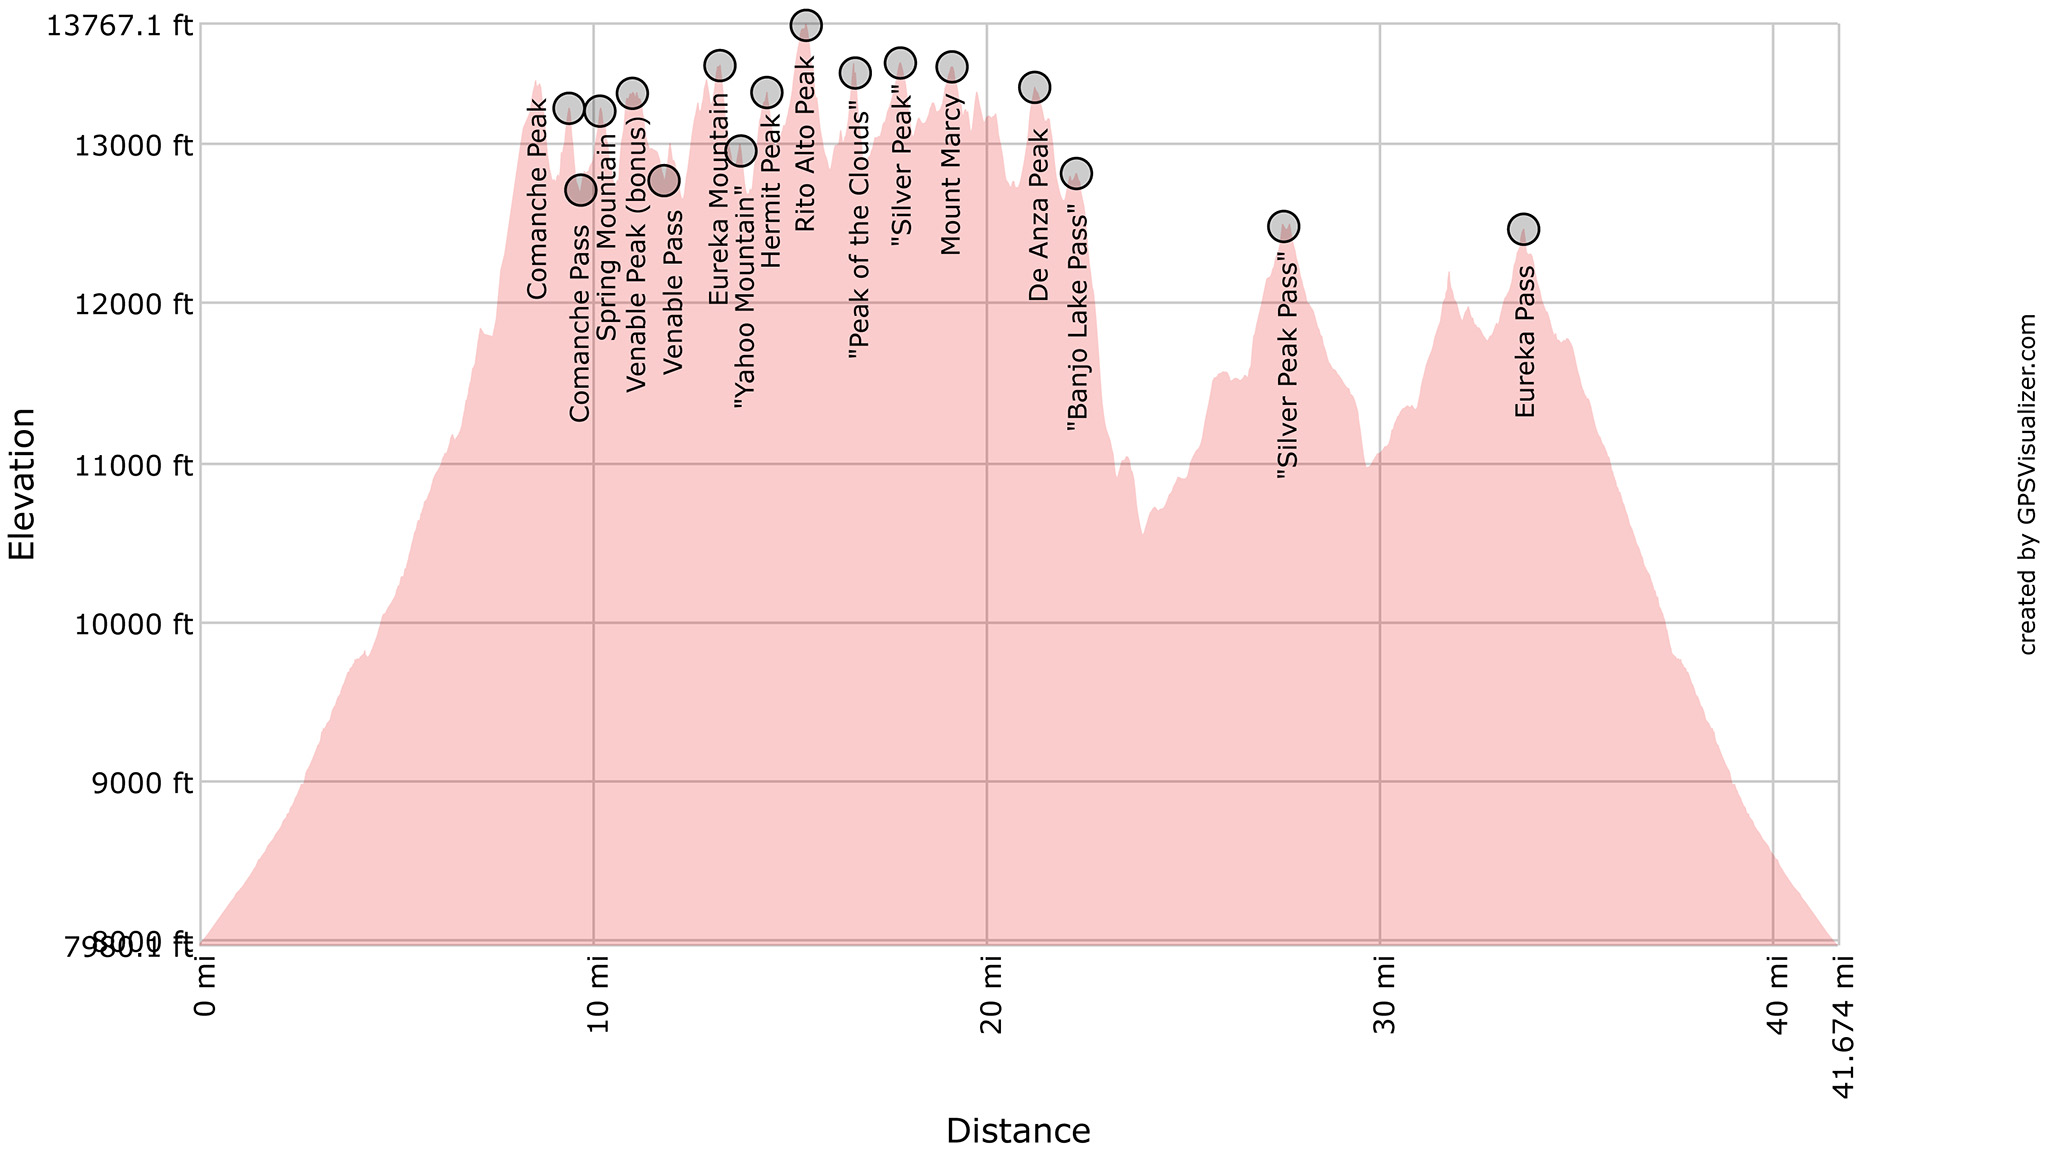
Crestone Sangres Sampler
41.72 miles, 16,970′ gain/loss


Get a taste of high ridge livin’ with this excellent ridge traverse section in the heart of the Sangres. Scrambling is kept to a minimum mostly at “Peak of the Clouds”, but one will get a good sense of what it’s like to travel for hours on end — and maybe even a bivvy up high — on the main ridgeline. You’ll also get a good sense of the difference between what the Ridge Traverse is like in comparison to the High Route, as sections of both are used to put this route together.
Since this route is on the ridge for so long, commitment is very high. The Sangres Sampler is a big step up from the Northern Sangre de Cristo Loop Route for those hungry for more adventure.
This route starts/finishes in the town of Crestone. We’ll first follow the North Crestone Trail to North Crestone Lake, where excellent camping is found, then gain the main ridgeline.
Follow Segment Four of the Sangre de Cristo Range Traverse route all the way to “Banjo Lake Pass” and drop off the ridge west down to Horsethief Basin.
Follow Segment Four of the Sangre de Cristo High Route north to south (the opposite direction as how the narrative is written) all the way back to the trail junction with Comanche Trail and the North Crestone Trail, then take the North Crestone Trail west back to the town of Crestone.
Difficulty does not exceed Class 3 (crux: descending “Peak of the Clouds”), with mostly Class 2 talus. The backpacking below the ridgeline is excellent, with wonderful views of the ridge crest from below. Taken together, this is absolutely a 5 star route, with little filler.
Several bailout points are located on the ridge to easily shorten your stay on the ridge itself depending on weather, time, motivation. These can be found at Venerable Pass, Hermit Pass, and the West ridge of Silver Peak (descend the ridge to the trail). It would be sensible to do this loop in either direction.
To start, from the town of Crestone, take CR 71 to the North Crestone Trail (or drive there, hitchhike).
Counter Clockwise
If going counter clockwise, hike up to North Crestone Lake to camp, or if weather is holding, hike to the ridgeline itself and camp in a depression somewhere near. I’ve camped just to the east of the route as mapped.
The next day, follow the ridge north. It’s 22 miles to where you’ll finally drop back down, so a bivvy on or near the ridge is very likely. Hermit Pass makes a conservative goal and makes an excellent high bivvy with almost guaranteed snow melt nearby, while also providing a good bailout to the east for the night if things start looking hairy.
Day 3 will have you complete the ridge and down “Banjo Lake Pass” west to the basin below.
Finish up the hike on good trails in the next two days.
Five days is a long time to be on route, so those with a higher level of fitness and a greater sense of urgency may be able to cut this time, especially if your goal is to one day do the full meal Ridge Traverse in a fast time. The problem is that good bivvying areas on the ridge in this section are few and far between, so you’ll have to go into any attempt with the expectations that you’re going to have a very mountaineer-like experience on route in less than ideal conditions, all but requiring you to spend some time taking an extended break on a bed of talus.
In the past, I’ve bivved right on the Comanche Trail (good enough), as well as on the northeastern ridge of Mount Macy (slightly desperate).