Introduction
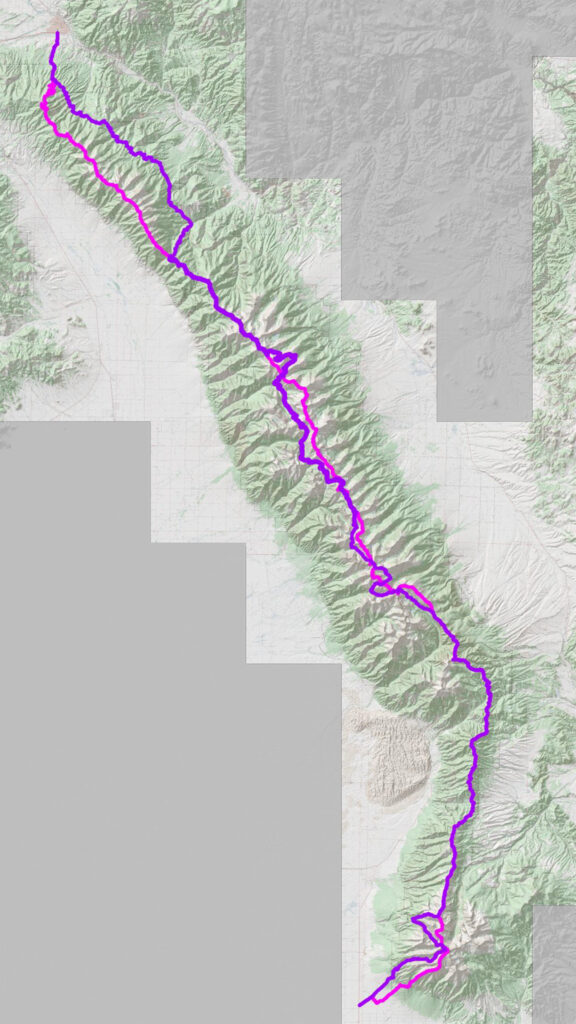
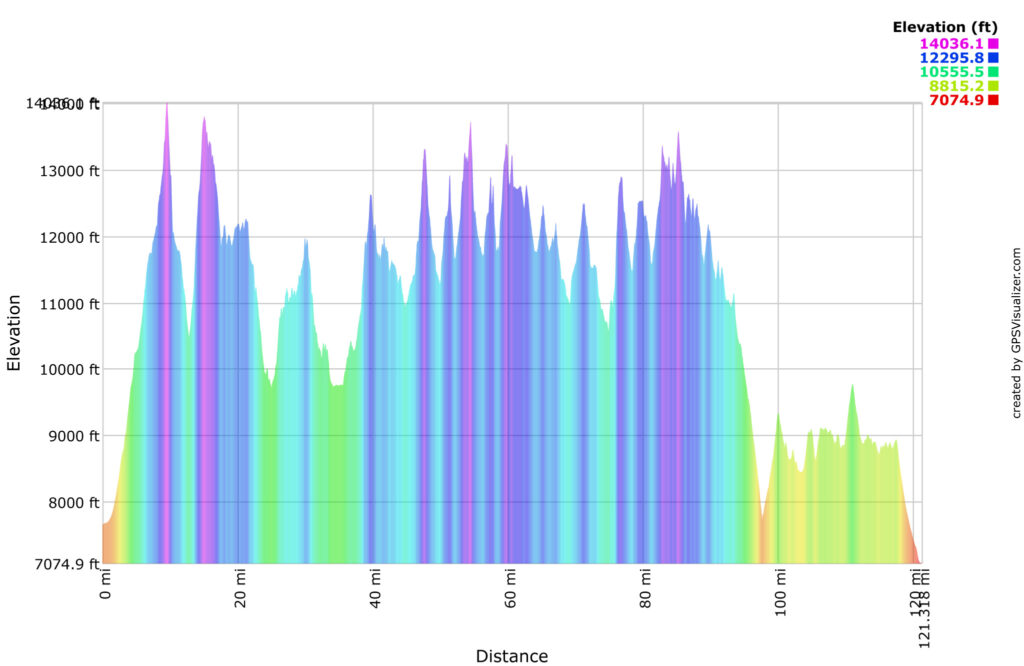
The idea of a high route of the Sangre de Cristo Range is an intriguing one, and if we look at sneaks around some of the harder parts of the Sangre de Cristo (Ridge) Range Traverse, we can start piecing one together.
Ultimately, only a few changes have to made in key areas to lower the commitment and difficulty level to something that advanced backpackers with long trail and peak bagging experience could enjoy.
A high route as described below is roughly the same distance as the ridge traverse, with the similar elevation gain/loss, but would take less effort to complete, as there are more fast travel trail sections and less slow travel talus hopping sections.
It may also be more impervious to bad weather, as travel below the ridge crest is far more safer than right on top of it. Better camping and water access would also be available.
Consider segments of the High Route as an option when the Ridge Crest itself is unrealistic. We’ll note times when both converge/diverge.
Although much easier than a ridge traverse, this is still not a beginner route, and a hefty amount of mountain travel experience is essential. High ridge travel is still mandatory and with that, comes the risks associated with such terrain.
High Route Segment 1
Introduction
Difficulty: Hard — Class 3 scrambling, Class 2 talus hoping and off-trail travel, Class 1 trails, exposure, above treeline travel.
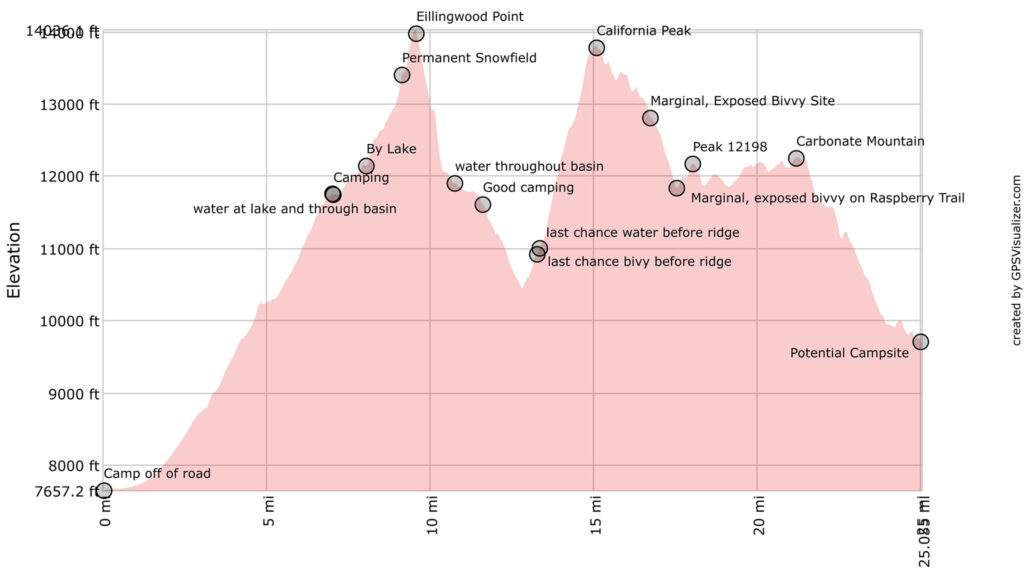
- 25.08 miles
- 11,639′ gain
- 9,578′ loss
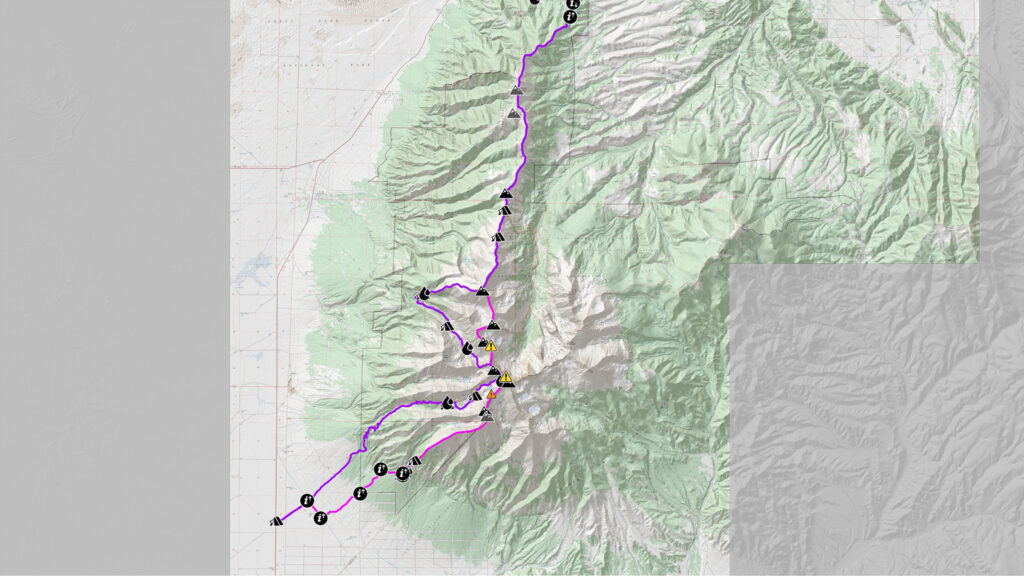
Segment 1 will start in one of the most busy and popular areas of the Sangre de Cristos and end in one of the most desolate. The elevation gain is massive.
Narrative
We’ll divert from the Ridge Traverse almost immediately. Doing so will allow you to skip the Class 4 climb up to South Little Bear/Little Bear and the Class 5 traverse from Little Bear to Blanca Peak.
0.0 Starting from the Lake Como Trailhead, follow the Lake Como Road to Lake Como. This road may prove busy with a spectrum of highly modified off road vehicles. If walking a hot, dusty 4WD track sounds unpleasant, know that you won’t be alone, as many peak baggers will be on the road with you. Read on for an alternative start in a different drainage, that skips Ellingwood Point.
7.07 Lake Como. Campsites are a-plenty in and around Lake Como, but this lake is a destination for rock crawlers and peak baggers, so be prepared for neighbors of the human, mosquito, and black bear variety.
8.07 Blue Lakes. This area may offer more isolated, above treeline bivy spots a little ways away from the action at Lake Como.
9.59 Ellingwood Point. Unite with the Ridge Traverse route for a hot second. This is the high point of the Sangre de Cristo High Route.
Descend Ellingwood’s North Ridge, until you come to its west ridge.
9.72 Ellingwood Point, west ridge. Leave the Ridge Traverse route. Descend the west ridge down via the C2 or C3 Couloir. (14ers.com trip narrative). This will be the technical crux of the segment @ Class 3. The C2 couloir is also somewhat loose, so take care descending into the basin. Dropping off the main ridge here allows you to skip the Class 5 downclimb off Ellingwood’s north ridge and the miles of Class 3 scrambling to California Peak, as well as affording you many excellent camping spots under treeline and with running water. It is somewhat circuitous, but does break up two major alpine sections.
10.7 South Zapata Lake. Once in the basin, head northwest, and pick up the South Zapata Creek Trail and continue on it northwest. Excellent camping is found a little down past treeline.
Alternative Start: The Lake Como area isn’t for everyone. An alternative start location can be found at the Zapata Falls TH (parking and USFS campground available). Start up the South Zapata Creek Trail to the trail junction described below. It’s < 2 miles to the trail junction from the trailhead.
13.04 Trail Junction. Turn right onto North Fork South Zapata Creek Trail heading northeast.
13.33 Head off trail and Summit California Peak via the West Ridge route. If the day is getting long and you do not want to spend a night high on the ridge, camp below.
15.11 California Peak. Rejoin the Ridge Traverse route to Mosca Pass. Refer to the Narrative for Segment 1 of the Ridge Traverse from California Peak for beta. There are no technical difficulties above Class 2, but there are miles of above treeline talus hopping and blowdown below treeline to contend with. Mosca Pass is dry, but there is a potential spring a mile west of the pass. There is NO water available in Segment 2, until Medano Pass.
High Route Segment 2
Introduction
Difficulty: Moderate — Class 1 trails and Class2+ bushwhacking, lack of water sources, blowdown, difficulty bailing.
- 22.11 miles
- 8,324′ gain
- 6,623′ loss
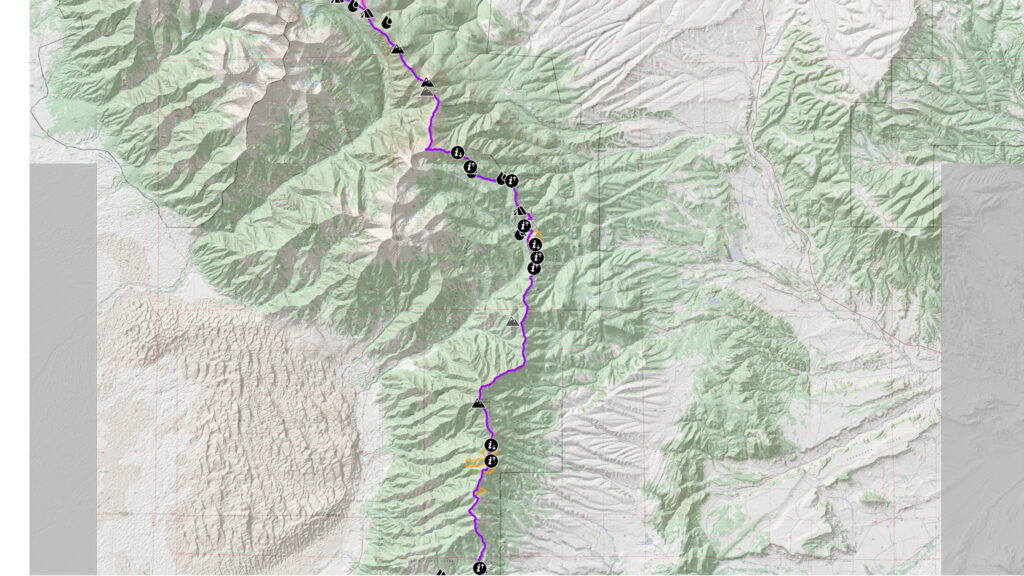
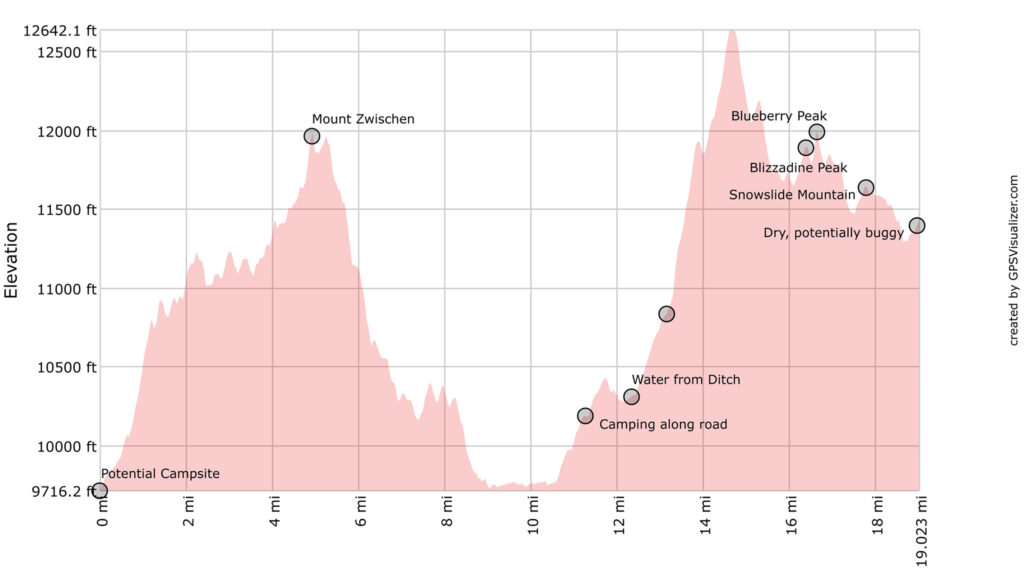
Follow Segment 2 of the Ridge Traverse route to Music Pass as written. Be aware that this segment is very dry until you get to Mosca Pass.
If you do not want to hike Mt. Zwischen, your best option is to drop off the ridge — and the range — by hiking down Mosca Pass, visiting the Great Sand Dunes National Park, hiking north, then rejoining the ridge at Medano Pass. Many side trips are possible once in the Great Sand Dunes.
High Route Segment 3
Introduction
Difficulty: Moderate — Class 1 trails and Class2+ bushwhacking and talus hopping, lack of water sources, blowdown, difficulty bailing.
- 14.85 miles
- 7,866′ gain
- 7,479′ loss
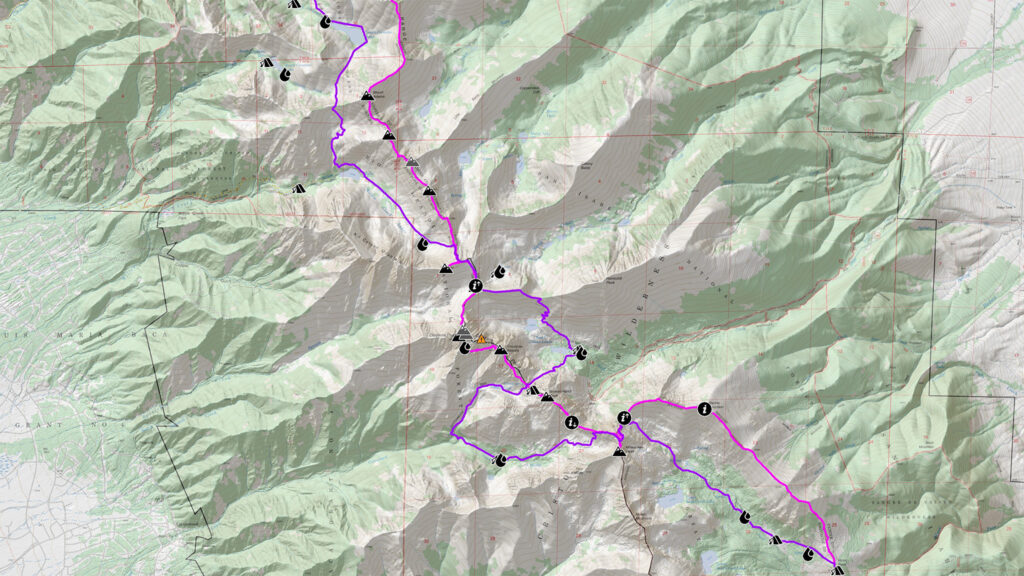
Segment 3 will be a large departure from the Ridge Traverse route, as an incredible amount of scrambling is found in this segment we would like to avoid. In its place, are some incredible on and off trail travel in extremely picturesque basins and seeing-is-believing passes. Our two routes crisscross each other many times, allowing you the choice to get off and on whichever route you would like. This will most likely be the standout Segment in the heart of the Sangre de Cristo mountains.
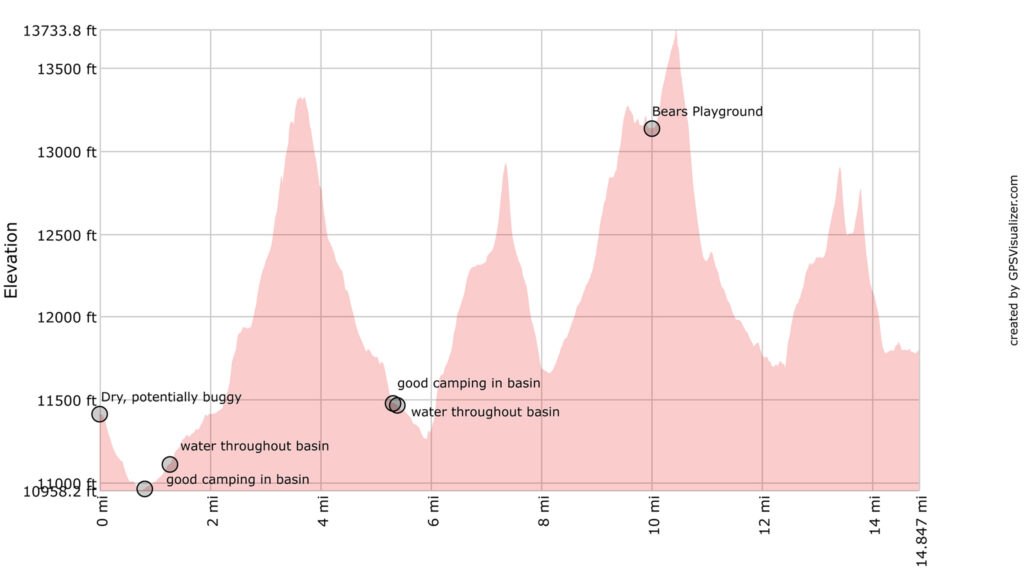
Elevation gain and loss on this segment is INTENSE (530 feet gain/loss every mile!), even when on the on-trail portions. Don’t let the low mileage fool you into thinking this segment will be a half-day affair. Astounding to think, as you will not summit a single peak!
Narrative
0.0 We’ll leave the Ridge Traverse route immediately. From Music Pass, drop down the west side of the pass, into the Sand Creek Basin, following the Lower Sand Creek Trail.
1.37 Trail junction. Continue northwest to Upper Sand Creek Lake.
2.27 Leave the trail. Continue Northwest up the slopes to the ridge between Marble Peak and Milwaukee Peak cross country.
3.27 Rejoin the Ridge Traverse route at the Mystery Trail near Milwaukee Peak.
3.61 Beer Pass. Continue past Milwaukee Peak heading west. This trail occupies an exciting position near the ridge crest, but the going is very easy.
4.09 At approx. 37.94990, -105.55718, drop off the ridge south towards the Cottonwood Creek Trail below.
4.17 Take the Cottonwood Creek Trail West to the junction with Broken Hand Pass.
5.92 Trail Junction. Turn right, heading north and ascend the Broken Hand Pass Trail to Broken Hand Pass.
Bailout: At the trail junction, continue to descend the Cottonwood Creek Trail west to the town of the Crestone. ~3.5 miles to the trailhead, 6.3 miles further to town.
7.36 Broken Hand Pass. Drop down the north into to the South Colony Lakes Basin.
8.1 Trail Junction. Take the South Colony Trail to the Humboldt Peak/Obstruction Peak saddle.
9.3 Humboldt Peak/Obstruction Peak saddle. Hike west to the Bears Playground. This off-trail section may need a bit of route finding.
10.2 Bear’s Playground. Rejoin the Ridge Traverse route, heading north.
10.44 Start descending north on the ridgeline just east of Obstruction Peak.
10.66 Descend off the ridge west at an opportune place and keep descending until you reach the upper Willow Creek Lake, leaving the Ridge Traverse route. This is a cruxy part of the segment, as the rock is loose, and the descent is steep!
10.94 Upper Willow Creek Lake. Follow Willow Creek NW to Lower (and larger!) Willow Creek Lake, wrapping around the lake to its north side. Camping is only allowed below treeline, west of the lake.
Get ready for a roller coaster of climbs that are done to avoid summiting Mt. Adams. This is one of the crux’s of the high route, as the technical difficulties could get higher if you pick a less than ideal line, and the amount of elevation gain/loss off trail over a short distance is immense:
12.41 Ascend the gully up to Mt. Adams’ west ridge.
13.38 Mt. Adams’ west ridge. Descend down into the South Crestone Lake Drainage.
13.57 South Crestone Lake Drainage. Ascend up Mt. Adams’ Northwest Ridge.
13.78 Mt. Adams’ Northwest Ridge. Descend down Mt. Adams’ Northeast Slopes into the North Crestone Lake Drainage.
14.84 North Crestone Lake Drainage. Good camping spots should be easy to find. North Crestone Lake is one of the largest lakes in the Sangre de Cristo Range.
High Route Segment 4
Introduction
Difficulty: Moderate to Difficult — Class 1 trails and Class2+ bushwhacking and talus hopping, lack of water sources, blowdown, difficulty bailing.
- 35.14 miles
- 14,677′ gain
- 15,778′ loss
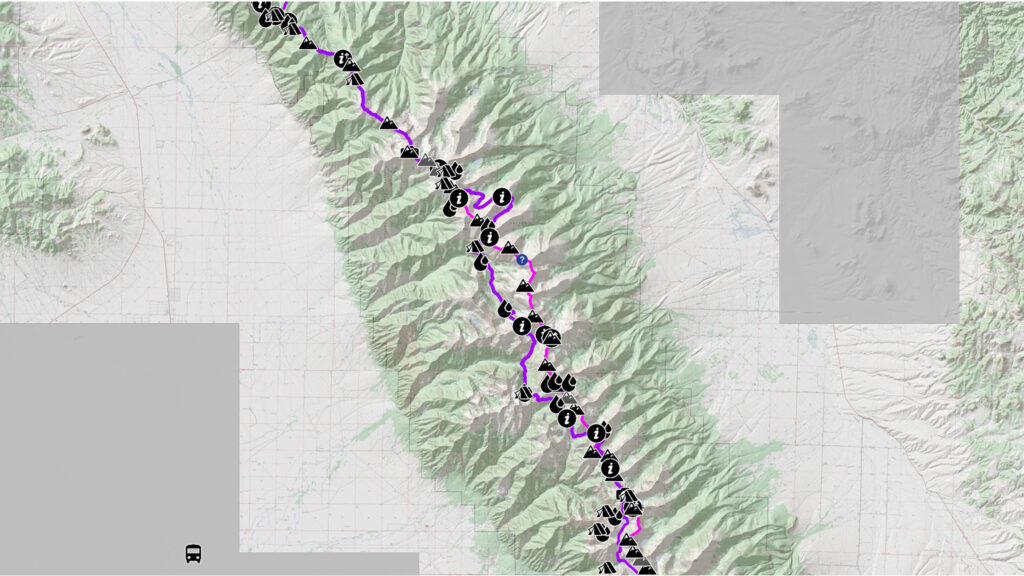
Get some good some rest at North Crestone Lake, as the climbing starts back up immediately. Duck under the high peaks on Phantom Terrace, before dropping into the surprisingly complex “West Side Trail Network”: a collection of trails which all fan out from/near the small town of Crestone, CO. This also makes getting to Crestone from various parts of this segment relatively easy and naturally makes this town the best resupply point of the entire route — perfect if you’re taking your time enjoying yourself out there.
Crestone itself is not a normal mountain town, but more of a quilt of different spiritual centers with a townsite hidden within. One peculiar aspect is that large business signs are not allowed, so you may need to poke around to find exactly what you would like. A hotel, post office, health food store, dispensary, coffee shop, brick oven pizza patio, and a bar are some of the amenities to source out.
The West Side Trail Network will end somewhat abruptly above Horsethief Basin at “Banjo Lake Pass”, but trail travel will continue east for a few more miles on a curious connector trail to “Electric Pass” until you’re again left to take the main ridge ever north.
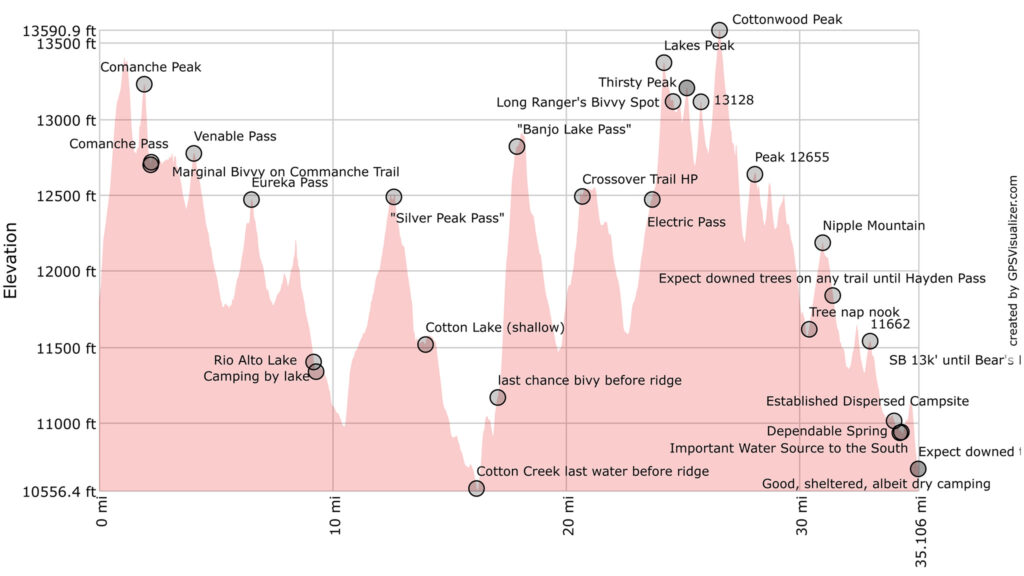
Climbing and descending on this segment is unrelenting during the on-trail parts, with many mini passes that will need to be summited. Don’t expect Colorado Trail-like cruising.
Narrative
0.0 From the North side of North Crestone Lake, start hiking up the tundra north to the col between Fluted and Comanche Peak.
0.9 Main ridge. Look back to North Crestone Lake for a breathtaking view of where you just were. In just a mile of travel, you’ve climbed over 1500′! Continue travel northwest on the main ridge (Class 2). This is the high point of the segment until you get to Cottonwood Peak, many miles away.
1.92 Comanche Peak.
2.21 Comanche Pass. Take Phantom Terrace found on the southwest slopes of Spring Mountain to southeast shoulder of Venable Peak.
3.18 Southeast shoulder of Venable Peak. Continue North to Venable Pass.
4.05 Venable Pass. Descend west on Venable Trail
5.35 Trail Junction, Venable Trail ends. Take the North Fork Crestone Trail west towards Eureka Pass. Taking this trail south will eventually lead you to the townsite of Crestone.
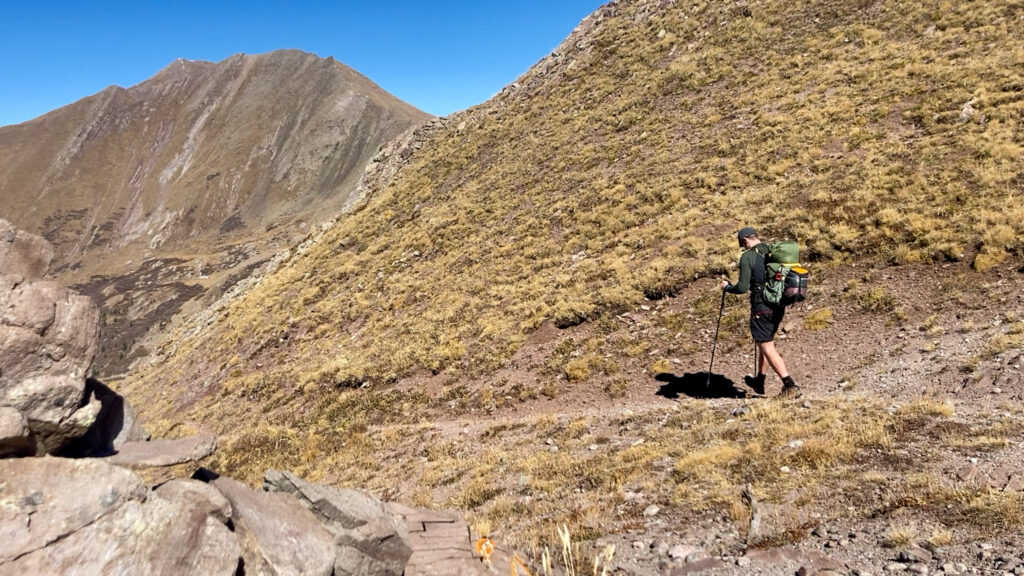
6.55 Eureka Pass
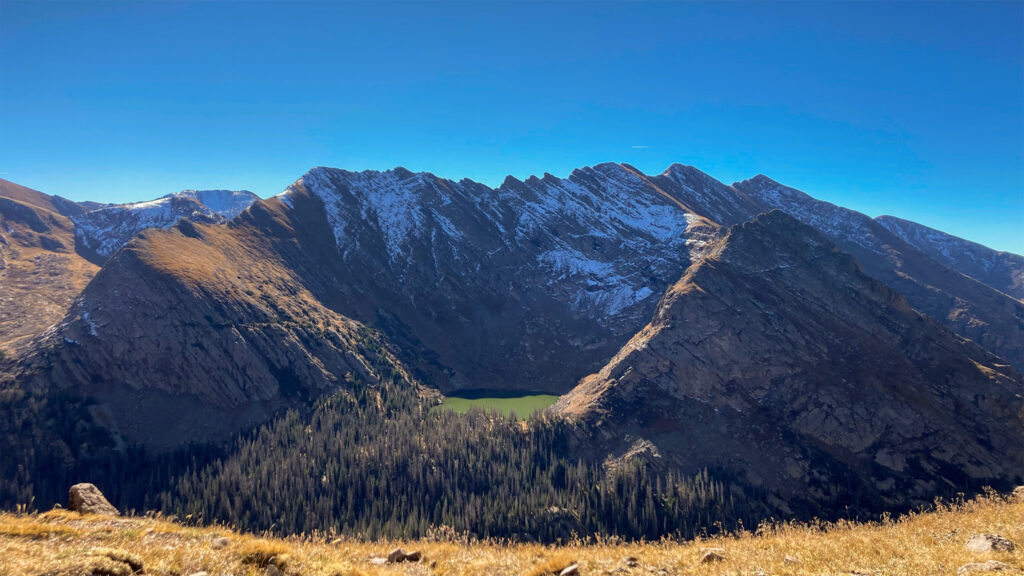
8.07 Junction with San Isabel Trail. Continue west on the North Fork Crestone Trail. Some of the most astounding looking camping may be found at San Isabel Lake.
8.68 Trail Junction with Rio Alto Trail. Turn left and take the Rio Alto Trail heading west.
9.34 Rio Alto Lake. Good camping. Trail will turn north.
10.52 Trail Junction with Cotton Creek Trail #749. Turn right on the Cotton Creek Trail northeast. To add some confusion, the Cotton Creek Trail is also called, “Rio Alto Trail” on some maps. Regardless, at the junction, take the trail that leads northeast that parallels the main ridge and NOT the trail that goes west downhill perpendicular of the ride (#745).
11.59 South slopes of “Silver Peak”. Trail bends to the northwest.
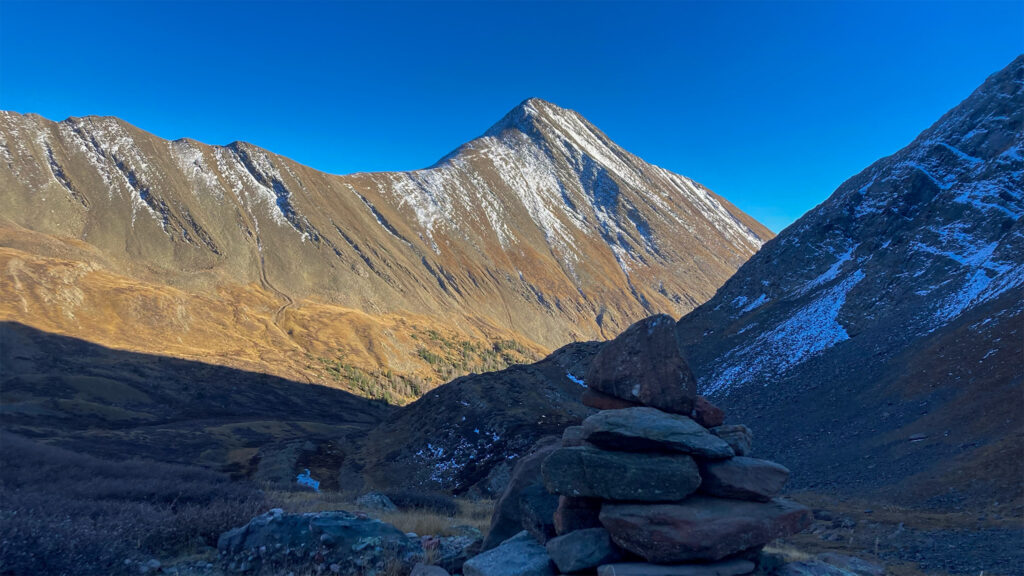
12.65 “Silver Peak Pass”
16.26 Trail junction with unnamed trail up to Horsethief Basin. Turn right and climb up unnamed trail up to Horsethief Basin.
16.87 Possible Trail Junction with trail #856. Turn right and continue up trail to Horsethief Basin to “Banjo Lake Pass”, found on the main ridge.
17.94 “Banjo Lake Pass”. Wrap around to the east side of the main ridge and continue following the trail, which will quickly split in two. Take the left fork Crossover Trail that ascends the southeastern slope of an unnamed peak, rather than the right fork, which descends down (South Brush Trail #1355).
18.59 Banjo Lake. Follow Middle Brush Creek on the Crossover Trail.
19.74 Cross Over Trail leaves Middle Brush Creek and starts ascending up the northeast ridge of Electric Peak, then descends into the South Brush Lake drainage.
22.73 South Brush Lake drainage. Continue following the Crossover Trail as it ascends up Lakes Peak.
23.38 Trail Junction. Turn left and head south to rejoin the main ridge below Lakes Peak at Electric Pass.
23.75 Electric Pass.
From Electric Pass, follow the narrative for Segment 4 of the Ridge Traverse until its end at Hayden Pass. Your highpoint of the Segment will be Cottonwood Peak at 13,597′, which gives an incredible view of the entire range to the south, as well as an excellent preview of what’s the come in the north. There are many small climbs, but the traveling is generally downward, towards Hayden Pass. Keep your wits about you, as you will encounter some loose rock and routefinding coming off of Cottonwood Peak, this will be another small crux to the high route. Test holds before committing.
Water is somewhat hard to come by at this end of the segment, but there is a very useful spring near Hayden Pass near mile 34.31 of this highroute segment.
35.04 Hayden Pass. Good camping can be found on the north side of the pass (dry).
High Route Segment 5
Introduction
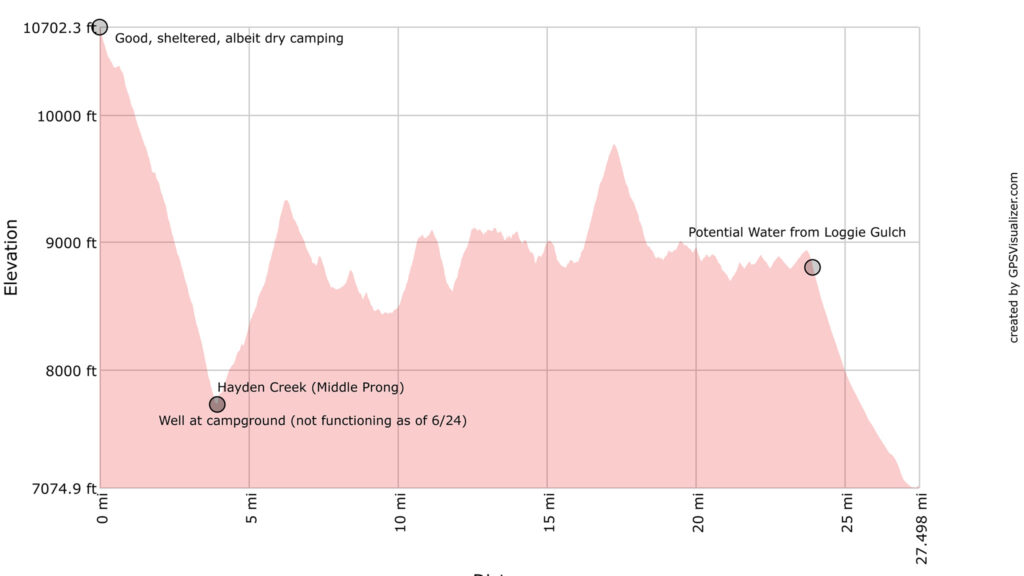
Difficulty: Easy. 4WD track and Class 1 trails.
- 28.3 miles
- 5,250′ gain
- 8,864′ loss
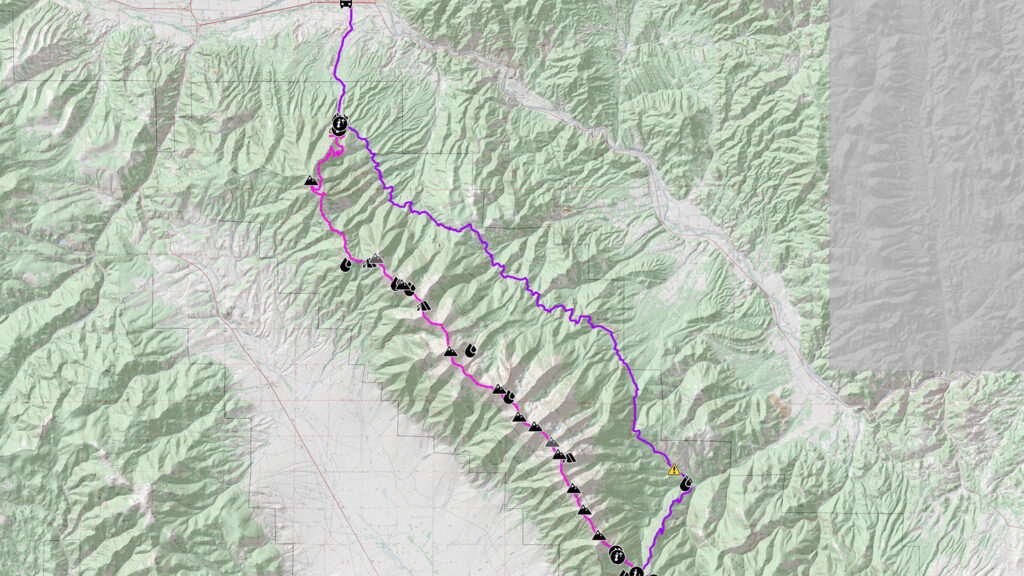
The final hurrah! Compared to the other segments, this one will be extremely mild in difficulty, all on-trail. Elevation will be much lower as you make your way on the east side of the range on the Rainbow Trail. If this is too mellow for you, take Segment 5 of the Ridge Traverse, paying special attention to the many bailout points that take you back to the Rainbow Trail, if things get hairy.
Narrative
0.0 Hayden Pass. Drop off the ridge by descending the Hayden Pass Road (4WD) northeast to the Hayden Creek Campground.
4.03 Hayden Creek Campground (USFS, first-come first-served). This is the low point of the entire High Route. Hayden Creek should have a strong flow, but there may also be a well available in the campground that may/may not be operational.
At the campsite, cross Hayden Creek on a bridge, and follow the trail towards the Rainbow Trail.
4.6 Trail Junction with Rainbow Trail. Take the Rainbow Trail northwest. You’ll be on the Rainbow Trail for many miles and you’ll be sharing this trail with day hikers and motorbike enthusiasts. Being of low elevation, the temperature may be much hotter than you’ve experienced on the rest of the route.
5.97 Trail Junction with the Bushnell Lakes Trail.
8.57 Trail Junction with Stout Lakes Trail.
13.54 Trail Junction with Hunts Lake Trail.
24.5 Rainbow Trailhead. Turn right on CR 108.
26.12 CR 108 will soon turn to pavement with houses and ranches dotting up around you. If you’re in serious need of water, a ditch is available near the road on the east side, but hold out if you can.
27.77 Turn slightly left onto CR 107 and listen to the rush of traffic on Highway 50.
28.13 Reach the corner of CR 107 and HW 50 and the end of this high route. This junction holds a hamburger joint and a convenience store. Revel in the fact that you have given yourself and your own blood to the Sangre de Cristo High Route!